- 最近看了一下 Spring Boot 框架底层原理,发现和 Laravel 框架的开发思想如出一辙,有了对 Laravel 框架的了解,看 Spring 轻松不少。
原理
- 解析代码中的注解,利用反射技术处理不同注解,完成Ioc初始化和注入,继承servlet处理请求和响应数据。
Ioc容器是核心,可以理解为一个HashMap里面保存了所有类的实例,可以根据Key随时拿到我们要的对象。
Ioc容器是什么样
Map<String, Object> ioc = new HashMap<>();
- 不要想复杂了,这就是个Ioc容器
如何处理 @Controller 注解
@Controller
public class Index {

}
Spring会把 @Controller 注解的类直接通过反射实例化保存到Ioc容器中,并把类名(Index)作为Key
Class<?> classObject = Class.forName("Index");
//isAnnotationPresent: B类型的注解是否在A类上,此处判断 @Controller 注解是否在 Index 类上
if (classObject.isAnnotationPresent(Controller.class)) {
    ioc.put("Index", classObject.newInstance());
}
如何处理 @Service 注解
@Service
public class IndexImpl implements IndexService {
    @Override
    public String echo() {
        return "Hello Spring";
    }
}
Spring会把 @Service 注解的类直接通过反射实例化保存到Ioc容器中,并把它实现的接口名(IndexService)作为Key
Class<?> classObject = Class.forName("IndexImpl");
if (classObject.isAnnotationPresent(Service.class)) {
    Service service = classObject.getAnnotation(Service.class);
    String beanName = service.value().trim();
    Class<?>[] interfaces = classObject.getInterfaces();
    for (Class<?> i : interfaces) {
        ioc.put(i.getName(), classObject.newInstance());
    }
}
如何处理 @RequestMapping 注解
@Controller
public class Index {
    @RequestMapping("/hello")
    public String echo() {
        return "Hello Spring";
    }
}
这里就不贴代码了,它依然是通过反射记录url到method的映射关系
包括@Autowired注解也是同样道理,通过反射将依赖注入到field
通过代码简单模拟 Spring Boot
- 首先请确保已自行安装好tomcat
- 推荐使用IDEA编辑器
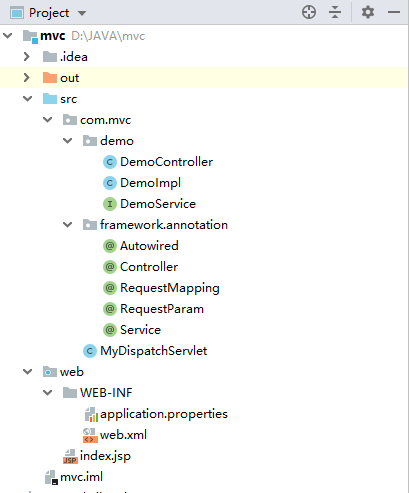
Step 1 新建Java Web项目
Step 2 配置阶段
1. 创建 MyDispatchServlet 类继承 HttpServlet,重写init()、doGet()和doPost()方法。
public class MyDispatchServlet extends HttpServlet {
    @Override
    protected void doGet(HttpServletRequest req, HttpServletResponse resp) throws ServletException, IOException {
        doPost(req, resp);
    }

    @Override
    protected void doPost(HttpServletRequest req, HttpServletResponse resp) throws ServletException, IOException {
    }

    @Override
    public void init(ServletConfig config) throws ServletException {
    }
}
2. 在 web.xml 添加配置,将所有请求交给创建的 MyDispatchServlet 处理
<?xml version="1.0" encoding="UTF-8"?>
<web-app xmlns="http://xmlns.jcp.org/xml/ns/javaee"
         xmlns:xsi="http://www.w3.org/2001/XMLSchema-instance"
         xsi:schemaLocation="http://xmlns.jcp.org/xml/ns/javaee http://xmlns.jcp.org/xml/ns/javaee/web-app_4_0.xsd"
         version="4.0">

    <servlet>
        <servlet-name>mvc</servlet-name>
        <servlet-class>com.mvc.MyDispatchServlet</servlet-class>
        <init-param>
            <param-name>contextConfigLocation</param-name>
            <param-value>/WEB-INF/application.properties</param-value>
        </init-param>
        <load-on-startup>1</load-on-startup>
    </servlet>

    <servlet-mapping>
        <servlet-name>mvc</servlet-name>
        <url-pattern>/*</url-pattern>
    </servlet-mapping>
</web-app>
- 在
中配置了一个初始化加载Spring主配置文件路径,application.properties文件放在/WEB-INF/下,内容如下:
scanPackage=com.mvc.demo
3. 定义注解
- @Controller注解
package com.mvc.framework.annotation;

import java.lang.annotation.*;

@Target({ElementType.FIELD})
@Retention(RetentionPolicy.RUNTIME)
@Documented
public @interface Autowired {
    String value() default "";
}
- @Autowired注解
package com.mvc.framework.annotation;

import java.lang.annotation.*;

@Target({ElementType.FIELD})
@Retention(RetentionPolicy.RUNTIME)
@Documented
public @interface Autowired {
    String value() default "";
}
- @RequestMapping
package com.mvc.framework.annotation;

import java.lang.annotation.*;

@Target({ElementType.TYPE, ElementType.METHOD})
@Retention(RetentionPolicy.RUNTIME)
@Documented
public @interface RequestMapping {
    String value() default "";
}
- @Service
package com.mvc.framework.annotation;

import java.lang.annotation.*;

@Target({ElementType.TYPE})
@Retention(RetentionPolicy.RUNTIME)
@Documented
public @interface Service {
    String value() default "";
}
4. 使用注解
- 创建控制器并使用@Controller,@Autowired,@RequestMapping注解
package com.mvc.demo;

import com.mvc.framework.annotation.Autowired;
import com.mvc.framework.annotation.Controller;
import com.mvc.framework.annotation.RequestMapping;

@Controller
public class DemoController {

    @Autowired
    private DemoService service;

    @RequestMapping("/hello")
    public String echo() {
        return service.echo();
    }
}
- 创建Service接口
package com.mvc.demo;


public interface DemoService {
    public String echo();
}
- 实现Service接口并使用@service注解
package com.mvc.demo;

import com.mvc.framework.annotation.Service;

@Service
public class DemoImpl implements DemoService {
    @Override
    public String echo() {
        return "Hello Spring";
    }
}
Step 3 初始化阶段
1. 声明Ioc容器、url映射关系和其他配置相关信息
public class MyDispatchServlet extends HttpServlet {

    //保存所有扫描到的相关类
    public List<String> classes = new ArrayList<>();

    //保存所有初始化的bean
    public Map<String, Object> ioc = new HashMap<>();

    //保存所有url和method的映射关系
    public Map<String, Method> urls = new HashMap<>();

    //和web.xml里init-param的值一致
    private static final String LOCATION = "contextConfigLocation";

    //保存配置的所有信息
    private Properties config = new Properties();
}
2. 重写init方法,实现拿到主配置文件的路径,读取配置文件中的信息,扫描所有相关的类,初始化相关类的实例并保存到IOC容器,从ICO容器取出对应的实例给字段赋值,即依赖注入,最后将url和Method进行关联。
@Override
public void init(ServletConfig config) throws ServletException {

    super.init(config);

    //加载配置文件
    loadConfig(config.getInitParameter(LOCATION));

    //扫描所有相关类
    scanner(this.config.getProperty("scanPackage"));

    //初始化所有相关类的实例保存到IOC容器中(Controller)
    initIoc();

    //依赖注入(Service)
    initDi();

    //生成url映射(RequestMapping)
    initUrl();
}
- loadConfig获取主配置文件路径,读取内容保存到Properties对象中:
private void loadConfig(String location) {
    InputStream i = getServletContext().getResourceAsStream(location);
    try {
        config.load(i);
    } catch (IOException e) {
        e.printStackTrace();
    } finally {
        try {
            i.close();
        } catch (IOException e) {
            e.printStackTrace();
        } catch (NullPointerException e) {
            e.printStackTrace();
        }
    }
}
- scanner扫描相关类并保存
private void scanner(String packageName) {
    URL url = this.getClass().getClassLoader().getResource("/" + packageName.replaceAll("\\.", "/"));
    File dir = new File(url.getFile());
    for (File file : dir.listFiles()) {
        if (file.isDirectory()) {
            scanner(packageName + "." + file.getName());
        } else {
            classes.add(packageName + "." + file.getName().replace(".class", "").trim());
        }
    }
}
- initIoc根据类名实例化,并放到IOC容器中,主要处理@Controller,@Service注解
private void initIoc() {
    if (classes.size() == 0) return;
    for (String className : classes) {
        try {
            Class<?> classObject = Class.forName(className);
            if (classObject.isAnnotationPresent(Controller.class)) {
                ioc.put(className, classObject.newInstance());
            } else if (classObject.isAnnotationPresent(Service.class)) {
                Service service = classObject.getAnnotation(Service.class);
                String beanName = service.value().trim();
                if (!beanName.equals("")) {
                    ioc.put(beanName, classObject.newInstance());
                    continue;
                }
                Class<?>[] interfaces = classObject.getInterfaces();
                for (Class<?> i : interfaces) {
                    System.out.println(i.getName());
                    ioc.put(i.getName(), classObject.newInstance());
                }
            }
        } catch (IllegalAccessException e) {
            e.printStackTrace();
        } catch (InstantiationException e) {
            e.printStackTrace();
        } catch (ClassNotFoundException e) {
            e.printStackTrace();
        }
    }
}
- initDi将初始化到IOC容器中的类,赋值依赖注入字段,处理@Autowired注解
private void initDi() {
    if (ioc.isEmpty()) return;
    for (Map.Entry<String, Object> entry : ioc.entrySet()) {
        Field[] fields = entry.getValue().getClass().getDeclaredFields();
        for (Field field : fields) {
            if (!field.isAnnotationPresent(Autowired.class)) continue;
            Autowired autowired = field.getAnnotation(Autowired.class);
            String beanName = autowired.value();
            if (beanName.equals("")) {
                beanName = field.getType().getName();
            }
            field.setAccessible(true);
            try {
                field.set(entry.getValue(), ioc.get(beanName));
            } catch (IllegalAccessException e) {
                e.printStackTrace();
            }
        }
    }
}
- initUrl将url和method进行映射,处理@RequestMapping注解
private void initUrl() {
    if (ioc.isEmpty()) return;
    for (Map.Entry<String, Object> entry : ioc.entrySet()) {
        Class<?> className = entry.getValue().getClass();
        if (!className.isAnnotationPresent(Controller.class)) continue;
        StringBuilder baseUrl = new StringBuilder("/");
        if (className.isAnnotationPresent(RequestMapping.class)) {
            RequestMapping requestMapping = className.getAnnotation(RequestMapping.class);
            baseUrl.append(requestMapping.value());
        }
        Method[] methods = className.getMethods();
        for (Method method : methods) {
            if (!method.isAnnotationPresent(RequestMapping.class)) continue;
            RequestMapping requestMapping = method.getAnnotation(RequestMapping.class);
            String url = baseUrl.append("/" + requestMapping.value()).toString().replaceAll("/+", "/");
            urls.put(url, method);
        }
    }
}
至此,初始化阶段的代码都已完成。
Step 4 运行阶段
在doGet方法调用doPost方法,在doPost方法中再调用doDispach()方法。
@Override
protected void doGet(HttpServletRequest req, HttpServletResponse resp) {
    doPost(req, resp);
}

@Override
protected void doPost(HttpServletRequest req, HttpServletResponse resp) {
    try {
        doDispatch(req, resp);
    } catch (Exception e) {
        e.printStackTrace();
    }
}
doDispatch处理所有请求,url请求不存在的返回404,通过url查找到对应的方法进行调用并返回。
private void doDispatch(HttpServletRequest req, HttpServletResponse resp) throws Exception {
    if (urls.isEmpty()) return;
    String contextPath = req.getContextPath();
    String url = req.getRequestURI().replace(contextPath, "").replaceAll("/+", "/");
    if (!urls.containsKey(url)) {
        resp.getWriter().write("...404");
        return;
    }
    Method method = urls.get(url);
    String beanName = method.getDeclaringClass().getName();
    String result = (String) method.invoke(ioc.get(beanName));
    resp.getWriter().write(result);
}
至此,一个简单版的Spring就完成了,运行后,在浏览器输入:http://localhost:8080/hello,正常返回:Hello Spring,输入其它地址则返回404。
不论注解还是xml配置,spring都是通过反射依赖注入,最终让我们有了一个好用的框架。通过这次实践让我彻底搞清楚了Spring底层原理

